A Task Description is a time interval that is used to define how often an inspection will be scheduled. Common task descriptions include daily, monthly, annual, 6 year, and 12 year. You will need to create one task description for each required inspection interval.
Here’s a video overview of the complete process:
Add a New Task Description
Step 1
Using the main navigation menu, hover your mouse over Tasks, then click on Task Description.

Step 2
On the Task Description screen, click the Add New button.

Step 3
First, enter the name of the task into the description box. Next, set the frequency that the task will repeat.
In the pictured example of the monthly task, Repeat Every 1 Month(s) is selected. With this selection, monthly tasks become due one month from the time they were last completed.

Step 4
Save the new task using the blue save button at the bottom of the screen.
Use Advanced Scheduling
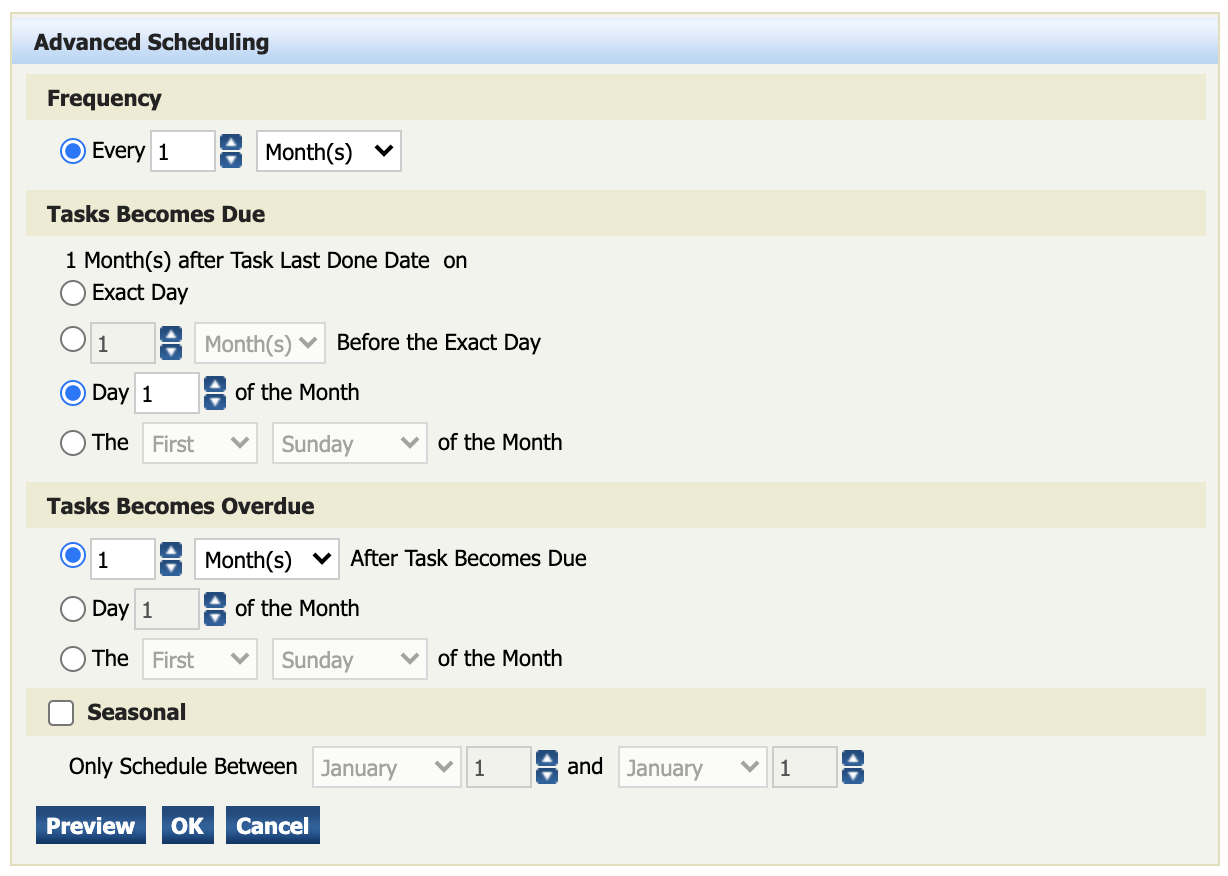
Within a Task Description, you can enable greater control over task scheduling by checking the box for Advanced Scheduling and then clicking the button that says Options…

Within Advanced Scheduling you start by setting the frequency. In this example the task is set to repeat every month.
Next, determine exactly when within the month the task should become due. In this example, all monthly tasks will become due on the 1st day of each month, regardless of what day they were completed in the previous month.
Finally, use the filters to determine when the task becomes overdue. This allows tasks to move to an overdue status when they are not completed on time.
The Seasonal selection prevents the task from being assigned during non-designated date periods.

When the filter selection is complete click the button that says OK to return to the task description setup page. Click the blue save button at the bottom of the Task Description screen to save your Advanced Filters to the Task.
Setup Cascaded Tasks
The use of Cascaded Tasks allows multiple tasks to be completed during a single inspection. This is a great efficiency booster within InspectNTrack! In this example the weekly task has been cascaded. This means that anytime a monthly and a weekly task are due at the same time, the technician only needs to perform the monthly inspection to complete both inspections.
The Cascaded Tasks feature is located on the Add/Edit Task Description screen. To access it, use the main navigation menu to hover your mouse over Tasks, then click on Task Description. On the Task Description dashboard menu, click on an existing task to edit it or add a new task.
To setup a Cascaded Task, scroll through the tasks in the Unused Tasks box to find the task you wish to cascade. Highlight the task by clicking on it with your mouse, then click the arrow button to move it into the Cascaded Tasks box. Repeat this for any additional cascaded tasks.
To remove a Cascaded Task, click on a task in the Cascaded Tasks box to highlight it, then click the left-facing arrow to move the task back to the Unused Tasks box.

When you are finished setting up Cascaded Tasks, click the blue save button in the lower left corner of the screen.
NOTE: Question Sets are not completed when Cascading is used; the Last Done Date is simply updated upon synchronization.

